
本文介紹了一個(gè)基于PC的示波器參考設(shè)計(jì)。重點(diǎn)介紹了MAX1393 ADC和MAX1396 EV (評(píng)估)板,文中給出了電路圖、軟件及軟件功能說(shuō)明。
引言
本參考設(shè)計(jì)提供了構(gòu)建一個(gè)示波器所需的全部電路(圖1),設(shè)計(jì)采用MAX1396EVKIT (參考設(shè)計(jì)要求用MAX1393ETB ADC替代MAX1396ETB ADC)和一臺(tái)PC,并提供了電路圖、Windows®軟件和微控制器固件。固件示例程序采用C語(yǔ)言編寫,利用IAR Embedded Workbench®平臺(tái)針對(duì)MAXQ2000進(jìn)行編譯,可免費(fèi)下載MAXQ® 1.13C,4K KickStart版本的IAR Embedded Workbench。
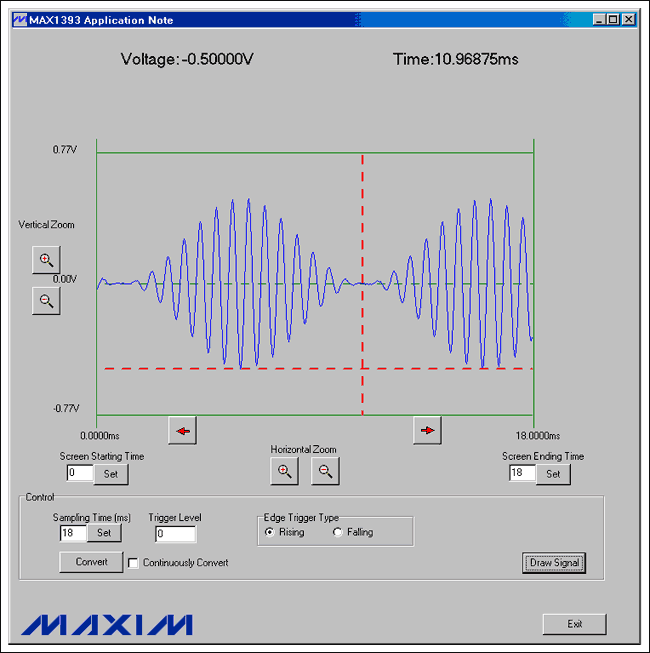
圖1. 基于PC的示波器
MAX1393簡(jiǎn)介
MAX1393為單通道、312.5ksps、真差分、12位SAR ADC。本參考設(shè)計(jì)采用MAX1393對(duì)輸入波形進(jìn)行采樣。
硬件簡(jiǎn)介
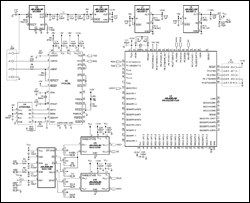
MAX1396EVKIT包括MAX1396 ADC (本設(shè)計(jì)中將其替換為MAX1393)、MAXQ2000微控制器、所有必需的無(wú)源元件以及經(jīng)過(guò)驗(yàn)證的PCB布局。MAX1396EVKIT原理圖如圖2所示。
MAX1396EVKIT的電路板上沒(méi)有安裝MAX1393,可通過(guò)Maxim網(wǎng)站訂購(gòu)MAX1393ETB的樣品,替換評(píng)估板上的MAX1396ETB。表1列出了所需的跳線設(shè)置。
詳細(xì)電路圖(PDF, 19kB)
圖2. MAX1396EVKIT原理圖
表1. 跳線設(shè)置
| Jumper | Position |
| JU1 | 1-2 |
| JU2 | 1-2 |
| JU3 | 1-2 |
| JU4 | 1-2 |
| JU5 | 1-2 |
| JU6 | 1-2 |
| JU7 | 1-2 |
固件簡(jiǎn)介
AN4530-firmware.zip文件包含的C程序可以使MAXQ2000的SPI™外設(shè)與MAX1393通信。當(dāng)MAXQ2000采用20MHz系統(tǒng)時(shí)鐘時(shí),SPI串行時(shí)鐘為5MHz。MAXQ2000從PC機(jī)收到命令后,微控制器即刻開(kāi)始從MAX1393獲取數(shù)據(jù)。存儲(chǔ)512個(gè)采樣數(shù)據(jù)后,MAXQ2000將數(shù)據(jù)發(fā)送給PC。
Windows程序簡(jiǎn)介
將MAX1396EVKIT通過(guò)USB電纜連接到PC機(jī)后,固件將等待接收Windows程序命令,如圖3所示。按下Convert鍵接收評(píng)估板采集的輸入信號(hào)數(shù)據(jù),然后顯示數(shù)據(jù)波形(圖4)。當(dāng)鼠標(biāo)光標(biāo)放置在波形區(qū)域時(shí),將在屏幕頂端顯示相應(yīng)的時(shí)間(Time)和電壓(Voltage),如圖5所示。表2給出了其它軟件功能。
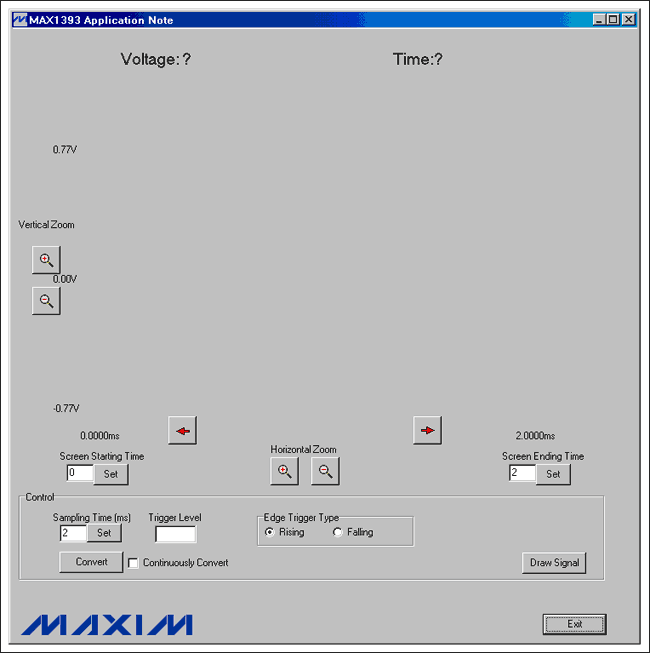 圖3. MAX1393參考設(shè)計(jì)的Windows程序啟動(dòng)
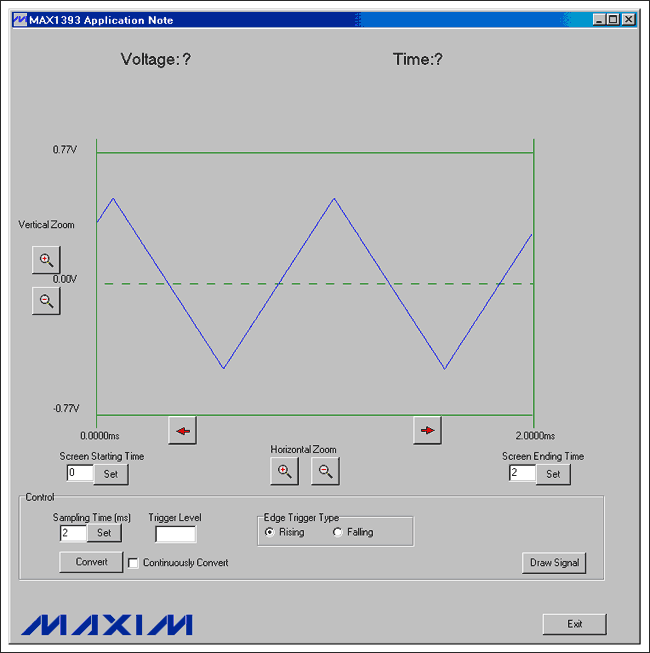
圖4. 顯示波形
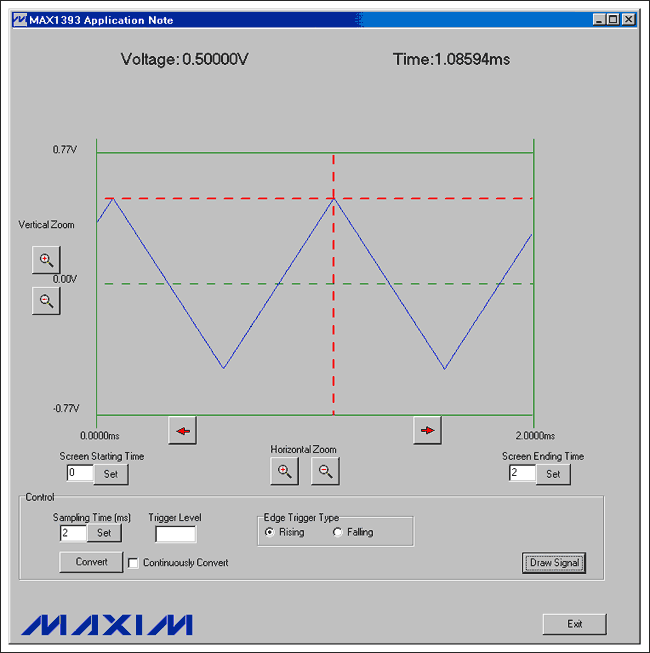
圖5. 在屏幕頂端顯示時(shí)間和電壓
表2. 軟件功能
| Button | Description |
 |
Vertically scales the waveform. |
 |
Horizontally scales the waveform. |
 |
Shifts the waveform horizontally. |
 |
Enter a value (in milliseconds) into the edit box and press the Set button to set the starting time at the left of the screen. |
 |
Enter a value (in milliseconds) into the edit box and press the Set button to set the ending time at the right of the screen. |
 |
Enter a value (in milliseconds) into the edit box and press the Set button to set the sampling time. |
 |
Enter a proper trigger-level value into this edit box. |
 |
Click on one of the two radio buttons to choose either rising-edge triggering or falling-edge triggering. |
 |
Press this button to receive input-signal data from the EV kit board and display the waveform on the screen. |
 |
Select this checkbox to receive continuous data from the EV kit and continuous updates to the waveform on the screen. |
 |
Press this button to redraw the waveform on the screen. |
 |
Press this button to exit the program. |
| Button | Description |
|
|
Vertically scales the waveform. |
|
|
Horizontally scales the waveform. |
|
|
Shifts the waveform horizontally. |
|
|
Enter a value (in milliseconds) into the edit box and press the Set button to set the starting time at the left of the screen. |
|
|
Enter a value (in milliseconds) into the edit box and press the Set button to set the ending time at the right of the screen. |
|
|
Enter a value (in milliseconds) into the edit box and press the Set button to set the sampling time. |
|
|
Enter a proper trigger-level value into this edit box. |
|
|
Click on one of the two radio buttons to choose either rising-edge triggering or falling-edge triggering. |
|
|
Press this button to receive input-signal data from the EV kit board and display the waveform on the screen. |
|
|
Select this checkbox to receive continuous data from the EV kit and continuous updates to the waveform on the screen. |
|
|
Press this button to redraw the waveform on the screen. |
|
|
Press this button to exit the program. |